In this article, we illustrate how to use a SendSafely Dropzone along with the Secure Package Export Utility to automate the download of received files to a selected folder location, and then sync those files to Google Drive for permanent storage or access by other company users.
The workflow implemented by this solution is summarized below:
- Files originate as uploads to a SendSafely Dropzone.
- The SendSafely Package Export Utility is used to periodically checks for new Dropzone submissions and downloads each new file submission to a local folder.
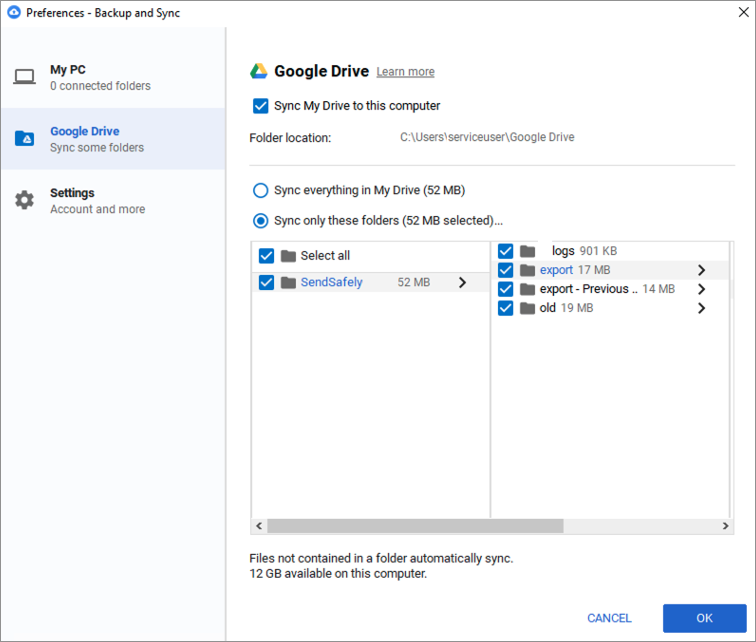
- The Google Drive Backup and Sync Utility is used to sync the local folder on the Server with a chosen Google Drive Folder. When a submitted file is saved to the local folder, it will automatically be copied up to the remote Google Drive folder.
Implementation Steps
1. Setup your Dropzone
If you do not have a SendSafely Dropzone already setup, please follow the instructions found here.
Your Dropzone should be set up under a dedicated SendSafely “service account” (a non-human user login) that is only used for this Dropzone. This is important as all files received by this service account will be downloaded. If this account is receiving files from other sources outside of this Dropzone, they will also be downloaded.
2. Configure the SendSafely Export Utility
Use the steps outlined here to download the SendSafely Package Export Utility and perform a “User Package Export”. This means you will need to:
a.) Follow the “Generating an API Key” instructions as your Dropzone “service account” user
b.) Generate a new “user key pair”
SendSafelyExportUtility.exe -genUserKey [your SendSafely host name] [your api key] [your api secret]
c.) Run the export user packages command. This will download and decrypt all the files submitted through the Dropzone(s) owned by your “service account” user
SendSafelyExportUtility.exe -exportUserPackages <SendSafely_URL> [your api key] [your api secret] [Private Key] [Key_ID#] [Destination Folder Path]
Below is an example of what the above command should look like:
SendSafelyExportUtility.exe -exportUserPackages https://yourcompany.sendsafely.com AABBBCCC XXXYYYZZZ c:\secure\111-2222-3333-4444.private_key.txt 111-2222-3333-4444 "C:\location\to-store\yourfiles\\"
Be sure to add the path to the destination folder (i.e. where you want the Utility to save the downloaded files) at the end of the command. Typically, this will be the local folder that is being synced to Google Drive (in the next step). As the source code for the Export Utility is provided (see below) you can also programmatically create the desired folder structure and file naming conventions when saving the files received via the Dropzone.
The server (or desktop) that the Export Utility executes on could be located on an internal company network, or within a cloud computing environment like AWS or Azure.
3. Add a Scheduled Task for the Export Utility
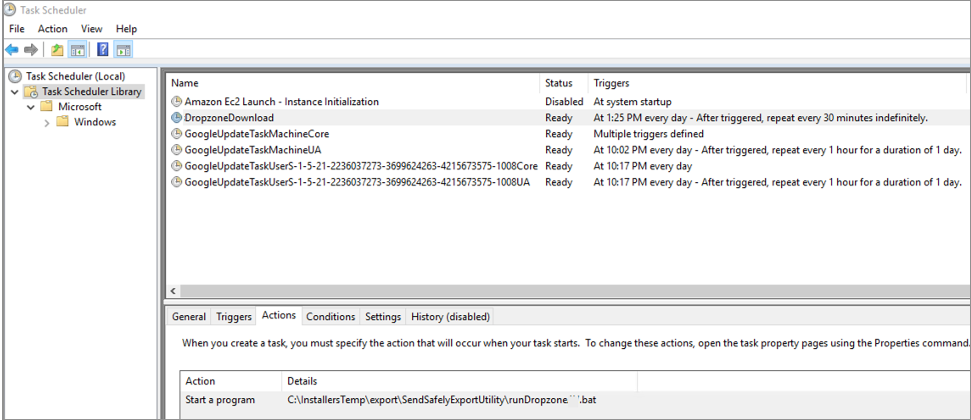
Use the Windows Task Scheduler feature to schedule the execution of the above SendSafely Secure Package Export Utility.
a.) Refer to this helpful link to schedule events: Run a task every x-minutes with Windows Task Scheduler
b.) There are several ways to utilize the Windows Task Scheduler to run the above Export Utility. One simple approach for this proof-of-concept example is to have it call a batch file that contains the command to execute the SendSafelyExportUtility.exe. For example:
C:\> Type C:\InstallersTemp\export\SendSafelyExportUtility\runDropzone.bat

@echo off

FOR /f %%a IN ('WMIC OS GET LocalDateTime ^| FIND "."') DO SET DTS=%%a
SET DateTime=%DTS:~0,4%-%DTS:~4,2%-%DTS:~6,2%_%DTS:~8,2%-%DTS:~10,2%-%DTS:~12,2%

SET LogName="C:\path_to\logs\%DateTime%.log"

echo "Start time %DateTime%" >> %LogName%

C:\path_to\SendSafelyExportUtility\SendSafelyExportUtility.exe -exportUserPackages https://yourcompany.sendsafely.com AABBBCCC XXXYYYZZZ c:\secure\111-2222-3333-4444.private_key.txt 111-2222-3333-4444 "C:\location\to-store\yourfiles\\" >> %LogName%

echo "Completion time %DateTime%" >> %LogName%
This batch file would then be called using the Windows Task Scheduler every 30mins to process new files that have been received (resumes in this PoC example).

4. Install the Google Drive Backup and Sync utility
Install the Google Drive Backup and Sync utility on the Windows Server (or Desktop). Follow these instructions and be sure to select the Export Utility destination folder specified in step(2) above as the folder to be synchronized to the selected Google Drive location.

Comments
0 comments
Please sign in to leave a comment.