The SendSafely Dropzone Connector for Custom Web Forms allows you to collect data about Dropzone submissions within a Google Sheet. By default, the Dropzone Connector will collect the Package Id, Timestamp, Submitter Name and Submitter email address, and the SendSafely Secure Link for any files and/or secure message Sent through SendSafely.
The Google Sheet Connector also has the ability to display additional custom form fields if you build your own encrypted web form using our Dropzone.
NOTE: The information that you collect in this Google Sheet may be important and/or highly sensitive:
- To ensure that only authorized persons can access this information, you should protect access to this Google Sheet with the appropriate G-Suite security permissions. Work with the appropriate stakeholders and teams within your organization to ensure that these access permissions are configured in accordance with your security and compliance policies.
- Making changes to the structure of this Google Sheet without understanding the impact may break the sheet's functionality. We recommend only granting View or Comment access to those members of your organization who need to read data from this Google Sheet.
Step 1 - Enable your SendSafely Dropzone
If you have not already done so, follow the instructions outlined here to turn on your SendSafely Dropzone.
Step 2 - Configure and Deploy the Connector in Apps Script
To proceed, make sure you have the latest SendSafely Dropzone Connector Google Apps Script. You can request this from support@sendsafely.com.
Create a copy of the Connector Template as a new Google Sheet in your Google Drive. To ensure consistent access and to prevent service disruptions in case of employee turnover, we recommend that the connector sheet be owned by a service account or group alias, such as uploads@yourcompany.com.
NOTE: The Google account that owns the Sheet must have permission to share documents externally. If this permission is restricted within your organization, your Google Administrator can use an access group to grant this permission to only the sheet owner.
After saving a copy of the Dropzone Connector Sheet and verifying that your account has the required sharing permissions, from the Spreadsheet view, select the “Extensions” menu, and then “Apps Script.”
As of 12/15/21, the new Google Apps Script editor does not support editing script properties. To complete the required configuration, click “Use legacy editor,” and proceed with the steps below.
Next, from the Code.gs view in the Script Editor complete the following steps:
i. Select Run > Run function > Setup. You will be prompted by Google to grant the necessary permissions for this script to work. Click “Allow”.
ii. Populate all of the required script properties (File > Project Properties > Script Properties)
gmail_sender_address - This should be the user that owns the Google Sheet. If this user is authorized by Gmail to send email on behalf of another address, you can choose another authorized address.
key - Autopopulated by the setup function, do not edit
sendsafely_error_notification_address - The email address to which you wish to send error reports in the event of a failed submission. If left blank, this will default to the Dropzone owner’s email address.
sendsafely_form_prefix - A prefix string used for custom fields on your Dropzone form. If your form has no custom fields, or if you do not want to log those fields in the Google Sheet, you can leave this blank (for Dropzones with custom fields, see Appendix A below).
sendsafely_validation_key - The Dropzone Validation Key for the account that owns the Dropzone. You can obtain this value from the "Dropzone" section of the "Edit Profile" screen in the SendSafely portal.
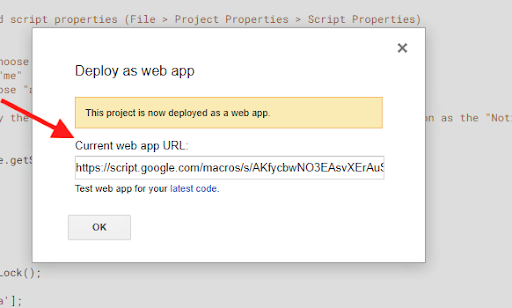
iii. Select Publish > Deploy as web app
- Under "Project Version", choose "New"
- Under "Execute as" choose "me"
- Under "Who has access" choose "anyone, even anonymous"
Anonymous users will only be able to post data to the sheet, but not view its contents. For security purposes, default input values are encrypted using the shared validation key to prevent tampering.
After pressing "Deploy" copy the Current web app URL and perform the following steps to update the SendSafely Dropzone Webhook and Form Input Label.
- Log into the SendSafely web portal and navigate to Edit Profile-> Dropzone.
- Paste the Google Apps Script URL into the "Use a Webhook for notifications:" under Notification Settings.

Step 3 - Test the Dropzone
Once you complete the steps above, you should be able to browse to the Dropzone URL or custom web form and upload a file. Verify that the submission data has been added to your Google Sheet as a new record. If all the data you require are collected, then your setup was successful.
Appendix A - Custom Fields
If you want to collect custom fields from your Dropzone into your Google Sheet, you’ll need to add columns to your Google Sheet for those custom fields to post to. Those columns and form fields must begin with your sendsafely_form_prefix (in step 2ii above). For example, if your prefix is “hr_” your columns and form fields may be “hr_cust_num” and “hr_driver_id”.
You can make this prefix any string you want, but we recommend keeping it succinct, and delimiting it with a special character such as a hyphen or underscore. Please note that the custom fields you are collecting are unencrypted, and should never contain sensitive information.
You will have to modify the JavaScript on the web page hosting your Dropzone, adding lines for the unencrypted fields you wish to collect to the JavaScript payload, in order to post those fields to your connector.
When a record posts to your connector, logic in the Google Sheet will take any extra parameters beginning with your sendsafely_form_prefix, and match them with the corresponding columns, where they will be stored.
Comments
0 comments
Please sign in to leave a comment.